class: center, middle, title-slide # Build a personal website with distill ## Part 2: Adding articles and deploying your website <img src="figs/distill.png" width="15%" /> ### Ariel Muldoon ### April 13, 2021 --- ## Today's Goal Overall - **Deploy your personal website** -- But first - Add more pages with **distill** articles - Go over article features, such as citations, references, and appendices - Add links to other articles to website menu pages - Add drop down menus to website navigation bar -- *Before we begin:* Make sure you either have your own `.bib` file or saved `article1.bib` from the class website onto your computer. On Windows + Chrome I right-clicked the file and used `Save as` to save. --- ## Resources - The **distill** website has articles on [**distill** article basics](https://rstudio.github.io/distill/basics.html) as well as [citations](https://rstudio.github.io/distill/citations.html) - GitHub docs has an overview of publishing via GitHub Pages [here](https://docs.github.com/en/github/working-with-github-pages/configuring-a-publishing-source-for-your-github-pages-site) .center[ <img src="figs/distill.png" width="30%" /> ] --- ## Why work with distill articles? **distill** articles are R Markdown documents with HTML output [optimized for scientific and technical communication](https://blog.rstudio.com/2020/12/07/distill/#what-is-distill). It is **distill** articles that we used to build a **distill** website last week and we'll continue with them today, adding additional content to your website. -- We'll do a quick overview of a few of the 🔔🔔 and whistles today. Including: - Creating a citation entry - Adding references using a `.bib` file - Using footnotes, asides, and appendices But you can do so much more! Refer to the [**distill** basics](https://rstudio.github.io/distill/basics.html) overview as you start to write your own articles. --- class: center, middle, inverse, hide-logo # <font style="font-family: cursive; font-style:italic">Let's get started!</font> --- ## Create new distill article Make sure you have your website RStudio Project open and ready to go. Create a new folder called `articles` in the root directory. We'll save the new articles there. -- Go to `File > New File > R Markdown...` Click `From Template` and then choose `Distill Article`. .center[] --- ## Create new distill article Save the file as `article1.Rmd` into the `articles` folder. Give the article a `title` (I used `"My first article"`) and then knit it to see the output based on the "filler" content. .center[ <img src="figs/week03_files/first_article.png" width="70%" /> ] ??? In the articles folder, not the root directory. Check twice. --- ## Author information You can see in the output that **distill** articles add author and author affiliation information at the top of the output. If you have multiple authors, add a new `- name` entry to the YAML header. Watch your spacing! I'm going to add myself as the second author. I include my affiliation but don't include any URL's so no links are added. ```r title: "My first article" description: | A new article created using the Distill format. author: - name: Nora Jones url: https://example.com/norajones affiliation: Spacely Sprockets affiliation_url: https://example.com/spacelysprokets * - name: Ariel Muldoon * affiliation: College of Forestry date: "`r Sys.Date()`" output: distill::distill_article ``` ??? Like always when working with the YAML header, be very careful with your spacing. Using correct indentations is important. --- ## Author information .pull-left[ After knitting: .center[] ] .pull-right[ You can see this might be useful if you were authoring a new article on the web or if you were giving an overview of a published article. If you don't want any author information, delete the whole `author:` section from the YAML header. ] --- ## Citeable web article If you are creating a stand-alone web article or presentation, you can add a citation by adding the appropriate URL to `citation_url` in the header. We don't currently have a URL for `article1` so I'll put in a filler URL to show what the output looks like. Note there are no spaces before `citation_url`. ```r title: "My first article" description: | A new article created using the Distill format. author: - name: Nora Jones url: https://example.com/norajones affiliation: Spacely Sprockets affiliation_url: https://example.com/spacelysprokets - name: Ariel Muldoon affiliation: College of Forestry *citation_url: https://rstudio.github.io/distill date: "`r Sys.Date()`" output: distill::distill_article ``` --- ## Citeable web article After knitting, scroll down to the bottom of the output page. You now have a citation for the page and a BibTeX entry that readers can easily copy and paste to cite your work. .center[] --- ## Citeable journal article If you want a journal citation, add information from the published article to the header. This would make sense if you were, say, putting the abstract of a published journal article in the **distill** document or writing a journal article. -- I'll change the `title`, `date`, and basic `author` info and then add the `journal` title, `volume`, and `doi`. ```r title: "Consequences of reduced light for flower production in conifer-invaded meadows of the Pacific Northwest, U.S.A" author: - name: Jessica Celis affiliation: Institute for Applied Ecology - name: Charles B. Halpern affiliation: School of Environmental and Forest Sciences - name: Ariel Muldoon affiliation: College of Forestry *journal: Plant Ecology *volume: 220 *doi: "10.1007/s11258-019-00952-x" date: "August 05, 2019" output: distill::distill_article ``` ??? They won't have time do write all of this but could copy and paste. --- ## Citeable journal article .pull-left[ Now the citation at the bottom of the output is for the journal article. .center[] ] .pull-right[ The BibTeX output is named using a *slug*, which it create automatically based on the given information. In this example the slug is `celis2019consequences`. You can set this manually using the `slug` option in the YAML header, as well. ] --- ## Citing other works .pull-left[ We can include citations in text and a list of references in the **distill** article if we provide a bibliography file. This can be, e.g., a BibTeX or CSL document. Save the `article1.bib` file I provided you into the `articles` folder. ] -- .pull-right[ If you haven't seen a `.bib` file before, take a minute to open `article1.bib` and look at the entries These particular citations are for R and R packages. Each entry has been given a name via a slug, which is the very first thing in the each entry. ] --- ## Citing other works .pull-left[ For example, the entry for R is called `R-base`. This slug is how we'll refer to the citation in the text. ```r *@Manual{R-base, title = {R: A Language and Environment for Statistical Computing}, author = {{R Core Team}}, organization = {R Foundation for Statistical Computing}, address = {Vienna, Austria}, year = {2021}, url = {https://www.R-project.org/}, } ``` ] -- .pull-right[ To use the references in `article1.bib`, refer to it via `bibliography` in the YAML header. Here is an excerpt of the YAML header with this added: ```r volume: 220 doi: "10.1007/s11258-019-00952-x" date: "August 05, 2019" output: distill::distill_article *bibliography: article1.bib ``` Note I refer to `article1.bib` directly because it is in the same folder as `article1.Rmd`. ] ??? If need to go into more detail, the RMD document will by default look in the same folder as it is in for any documents. That's why we can refer to it directly, since it is in "articles" and so is article1.Rmd. --- ## Citing other works .pull-left[ Once you've defined your `.bib` file that contains the references, add citations using `@` with the `.bib` slug. To put citations in parentheses, use brackets. For example, I'll add the following to the text of `article1.Rmd` to cite R. ```r All analyses were done using R 4.0.4 [@R-base]. ``` A `References` section is added to the output automatically. ] -- .pull-right[ After knitting: .center[] ] *If you want a specific style for references, see instructions on how to change citation style in the [R Markdown Cookbook](https://bookdown.org/yihui/rmarkdown-cookbook/bibliography.html#changing-citation-style)*. ??? Point out the citation in parentheses in the body and the citation in the "References" section at the bottom. --- ## Citing other works .pull-left[ By default, only references you refer to in the text are included in the output. If you want all entries in the `.bib` filed added to the references, add ```r nocite: '@*' ``` to the YAML header. There should be no spaces before `nocite:`. <br/> I added this to the bottom of my current header in `article1.Rmd`. ] -- .pull-right[ After knitting, all references in the `.bib` file are included under `References`: 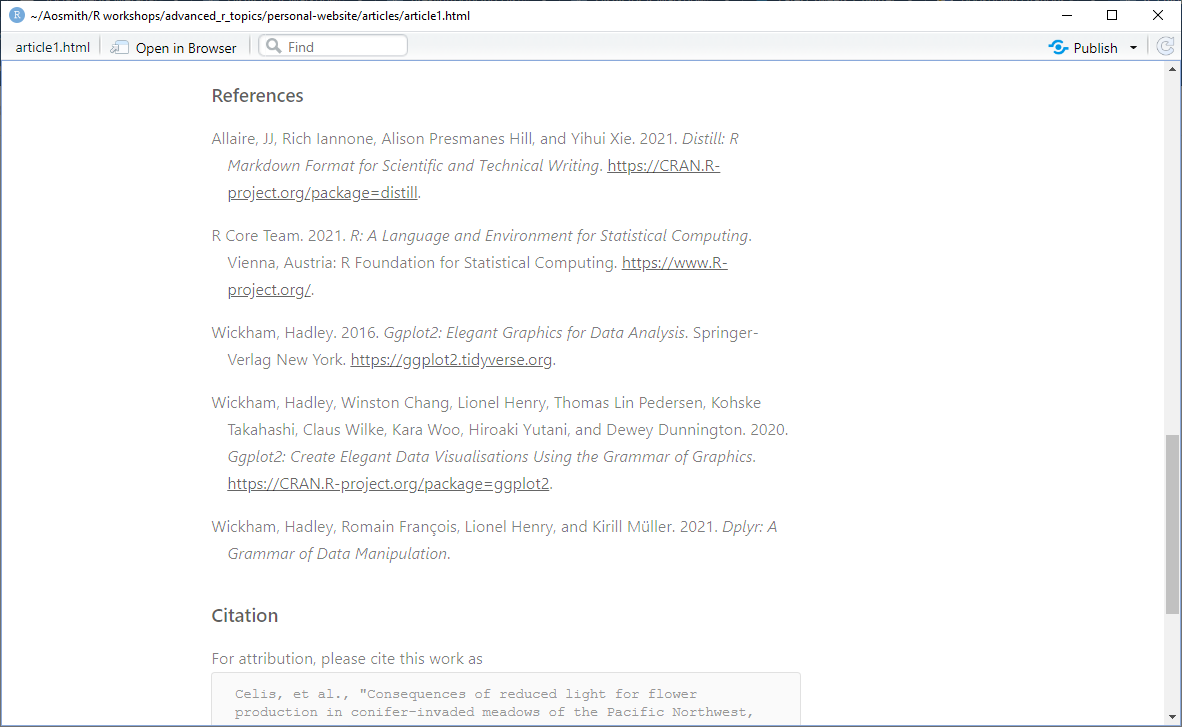 ] --- ## Create another distill article Make another new distill article and save it as `article2.Rmd` in the `articles` folder. We'll leave the YAML header info alone this time, and focus on the syntax for footnotes, asides, and appendices. ??? Process will be to add text to body of document and then knit to see the output. --- ### Footnotes .pull-left[ The syntax for adding hoverable footnotes is `^[text]`. Footnotes are automatically numbered. Let's add some text to the body of `article2.Rmd` to see this in action. The text I used: ``` Sometimes all the information is not in the body ^[Because it is in the footer]. When you do that you'll add footnotes ^[By adding footnote syntax]. ``` ] -- .pull-right[ Which results in: .center[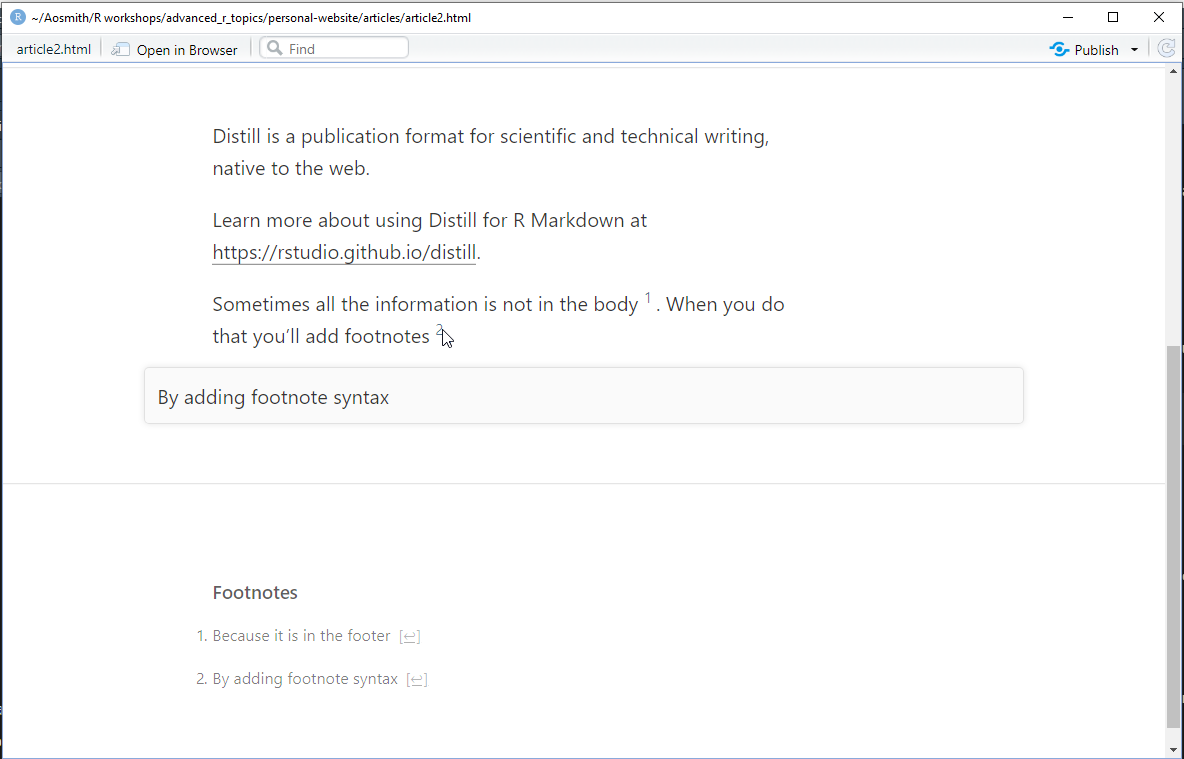] ] ??? Add the text to the Rmd and knit. Pic shows hovering and footnote as well as footnotes on bottom --- ### Asides An *aside* is when you put information to the far right of the document in what is called the *gutter*. The gutter is a used, for example, in Edward Tufte's books. The syntax for an aside is `<aside></aside>`. -- Asides can be text. ``` <aside> This comment is on the side. </aside> ``` -- They can also be output from code chunks such as plots. <aside> ```{r} plot(cars) ``` </aside> ??? Copy and paste the two asides into article2.Rmd to knit and see the result. --- ### Asides After adding the two examples to `article2.Rmd`, knit to see the output. .center[ <img src="figs/week03_files/asides.png" width="90%" /> ] --- ### Appendices Appendices are added at the end of the document by adding `{.appendix}` after any level 1 (`#`) or level 2 (`##`) header. This makes sense for, e.g., acknowledgments or author's notes. -- <br/><br/> Let's add the following to the text in `article2.Rmd` to see this in action. <br/><br/> ``` ## Acknowledgments {.appendix} You can recognize people and institutions in acknowledgments. ``` --- ### Appendices An appendix is put at the bottom of the article, placed before any footnotes. .center[ <img src="figs/week03_files/appendix.png" width="60%" /> ] ??? Knit to see output --- ## Adding articles as links Now that we have some "articles" of our work to share, let's add them to the website. For a relatively simple website like the one we've made so far, one approach is to link to the article output from within one of our menu pages. -- Open `about.Rmd`. Remember that the output of this is associated with my `Publications` menu on the website. Here's the relevant `navbar` code from `_site.yml`: ```r navbar: right: - text: "Hello" href: index.html * - text: "Publications" * href: about.html - text: "Teaching" href: teaching.html - icon: fab fa-github href: https://github.com/aosmith16/personal-website ``` ??? Remind them that _site.yml defines all menus and the page associated with that menu so if they forget which menu goes with which document they can check. --- ## Adding articles as links We'll add the articles to `about.Rmd` as if they contained information for the elements in a list of publications. This is one way to use a `Publications` menu. -- <br/> Here's the text I added to `about.Rmd` to do this. ``` ## Current publications - [Consequences of reduced light for flower production in conifer-invaded meadows of the Pacific Northwest, U.S.A](articles/article1.html) - [Another article](articles/article2.html) ``` ??? Copy and paste this code and then we'll talk about the relative links. Should have done this more explicitly in week 2 when did pic in "images" folder. --- ### Relative links .pull-left[ You can see in the code in the last slide that we refer to files in child folders using paths *relative* to the root directory. So `articles/article2.html` - Points first to the `articles` folder in the root directory - And then to the `article2.html` file within that folder. ] .pull-right[ Here's what my root directory looks like right now: 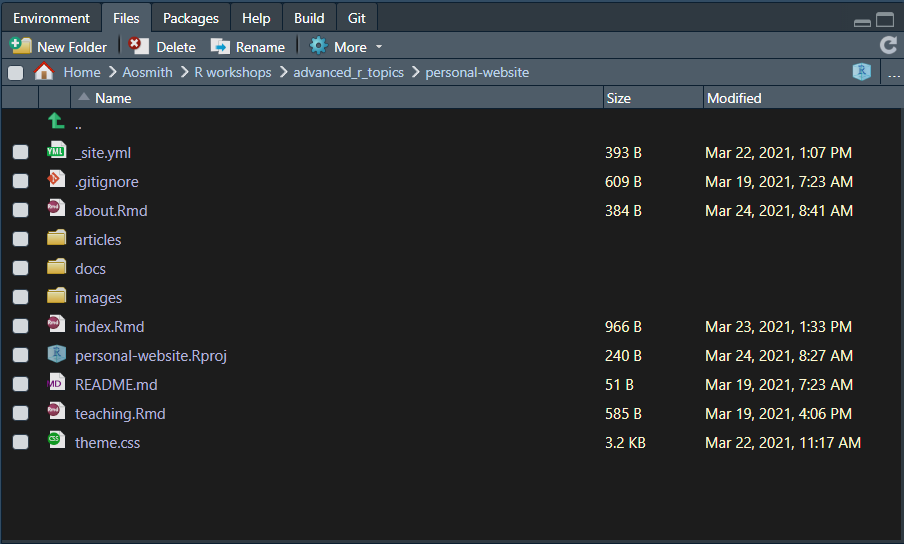 ] -- **Important**: Only files in the root directory are re-created when you build. You must knit other files manually if you make changes to them. --- ## Adding articles as links .pull-left[ Once you build the website, the information in the `Publications` menu reflects what we added to `about.Rmd`. 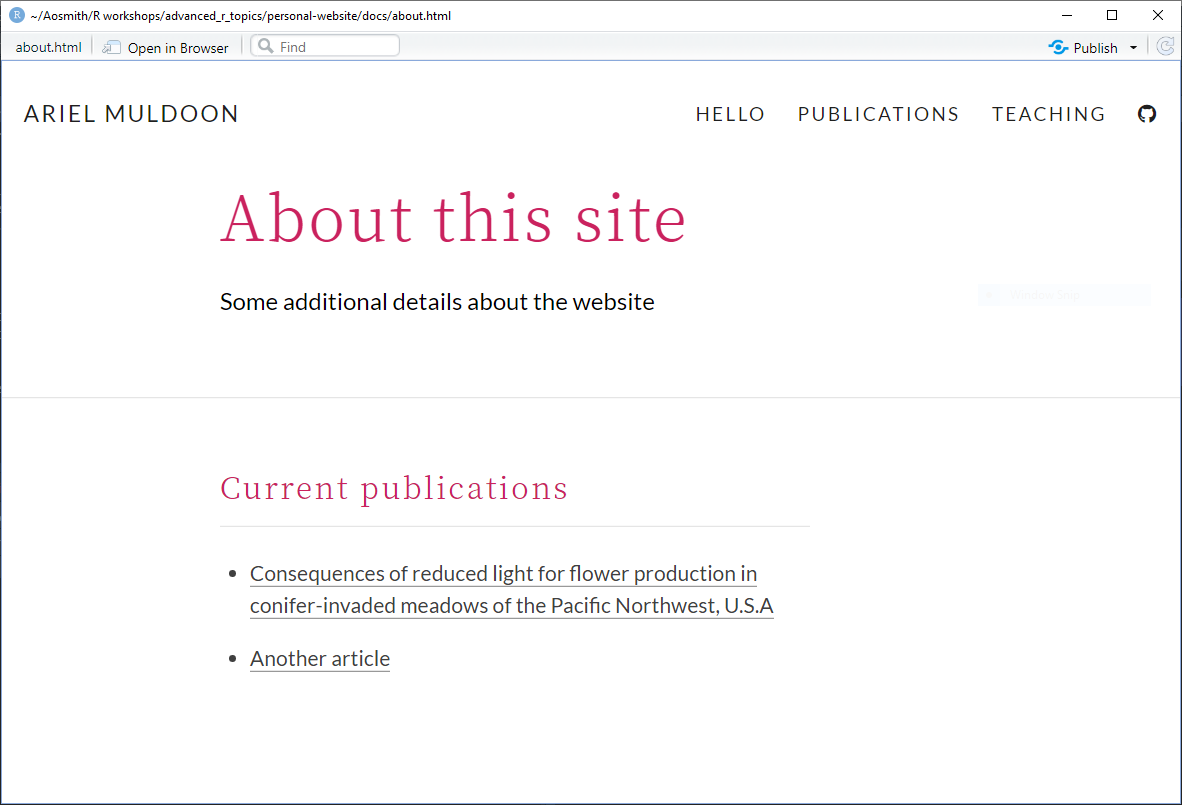 ] ??? We've been knitting individual files but now have made changes to the website so will build to see the whole thing. -- .pull-right[ **Of note:** Links to articles in child folders do not have the navigation bar or the website theme. Some options: - Add themes via css files to individual articles. Here's example code on how to refer to your current theme: .smaller[ ```r output: distill::distill_article: theme: !expr here::here("theme.css") ``` ] - To make a page part of the website (with the navigation bar) it must either be in the root directory or you can switch to using [**distill** blog posts](https://rstudio.github.io/distill/blog_workflow.html) (*not covered in this session*). ] ??? This is an important aside. Some may not follow but should say anyway. Note use of package **here**. --- ## Adding articles as drop-down menus .pull-left[ Another option is to make drop-down menus to link to your articles. This might make most sense when you want to link to a relatively small number of pages. You make drop-down menus under `navbar` in `_site.yml`. ] -- .pull-right[ The key is to add `menu:` below the menu `- text` and then adding `text` and `href` links. Here I added the two articles as a drop-down menu under "Teaching". ```r navbar: right: - text: "Hello" href: index.html - text: "Publications" href: about.html - text: "Teaching" * menu: * - text: "First article" * href: articles/article1.html * - text: "Second article" * href: articles/article2.html - icon: fab fa-github href: https://github.com/aosmith16/personal-website ``` ] ??? The text is the name of the drop down menu and the href links to the page. Note use of relative links. Definitely watch the spacing when doing this. --- ## Adding articles as drop-down menus After building the site you'll see the new drop-down menus with links to the articles. .center[  ] --- class: hide-logo ## Deploying website Once we have a working draft of our website, it's time to deploy. 😁 We've set things up to use [GitHub Pages](https://pages.github.com/) for this. (*But also see [Netlify](https://www.netlify.com/).*) -- <br/> 🤔 Did you forget to push local changes to GitHub? If so, do it now before proceeding. -- <br/> Go to your website GitHub repository and then go to `Settings`. .center[  ] --- class: hide-logo ## Deploying website Once you are in `Settings`, click on `Pages` near the bottom of the left sidebar. .center[ <img src="figs/week03_files/ghpages.png" title="Picture of GitHub Pages menu with sidebar" alt="Picture of GitHub Pages menu with sidebar" width="75%" /> ] ??? One up from bottom on left sidebar. --- class: hide-logo ## Deploying website .pull-left[ From the drop-down menu under `Source`, select `main`.  ] -- .pull-right[ Then from the next drop-down menu select `/docs`.  ] --- class: hide-logo ## Deploying website .pull-left[ Finally, hit the `Save` button to save these settings.  ] -- .pull-right[ Refresh the page to check for changes. You are waiting (and waiting ⏱) to see the message: `Your site is published at https://username.github.io/repository-name/` Where `username` is your GitHub user name and `repository-name` is the name of the repository with the website. ] -- <br/><br/> .center[Once you see that message, go to the link to view your *live* website. 🎉] ??? Don't click on things to early or you may get a 404 message. Clear cache or unpublish by selecting "None" and then do the process again but wait a little more patiently. (https://github.community/t/pages-user-site-not-published/10280/3) --- class: hide-logo ## Deploying website A couple other things: - Whenever you edit your website and push the changes to GitHub your website will automatically update. Be sure to wait a bit before checking if the updates took. 😉 - If you want to take your website down, go back to `Settings > Pages`, choose `None` as the source, and `Save`. .center[] --- class: hide-logo ## Search engine optimization You are going to find that your website does not come up at first when you search your name. 😞 But this should change over time! 🙂 If not, you may want to research search engine optimization (SEO) to see what you can do to make your website associated with your name in search results. -- A few ideas: - Having your name as your site title should be a good start. - If you ever decide to get a custom domain, use your name as part of the website address. - Make sure you link to your website far and wide. This means, e.g., adding it as your website in all your social media accounts. ??? Seems like Netlify could make putting your name as part of the URL easier then GitHub pages, although will not cover that today. --- class: hide-logo ## Next week - That's all we're going to do on websites in this class. Hopefully you have a good start! 🤗 - Next week we'll switch to making tables using package **gt** - Download/save `week04_gt_basics.Rmd` from website prior to class - Make sure you have installed current versions of packages **gt** and **dplyr** .center[ <img src="figs/gtlogo.svg" title="Logo for package gt" alt="Logo for package gt" width="15%" /> ] .footnote[ [Code for slides](https://github.com/aosmith16/spring-r-topics/tree/main/docs/slides) Slides created via the R packages: [**xaringan**](https://github.com/yihui/xaringan), [gadenbuie/xaringanthemer](https://github.com/gadenbuie/xaringanthemer), [gadenbuie/xaringanExtra](https://github.com/gadenbuie/xaringanExtra) .center[*This work is licensed under the Creative Commons Attribution-NonCommercial 4.0 International License. To view a copy of this license, visit http://creativecommons.org/licenses/by-nc/4.0/.*] ]